
The Inventory editing screens and tabs: finding your way around
Click a record’s title or image from the Inventory index to open it for editing. The image is shown on the right throughout; the tabs on the left switch between groups of fields.
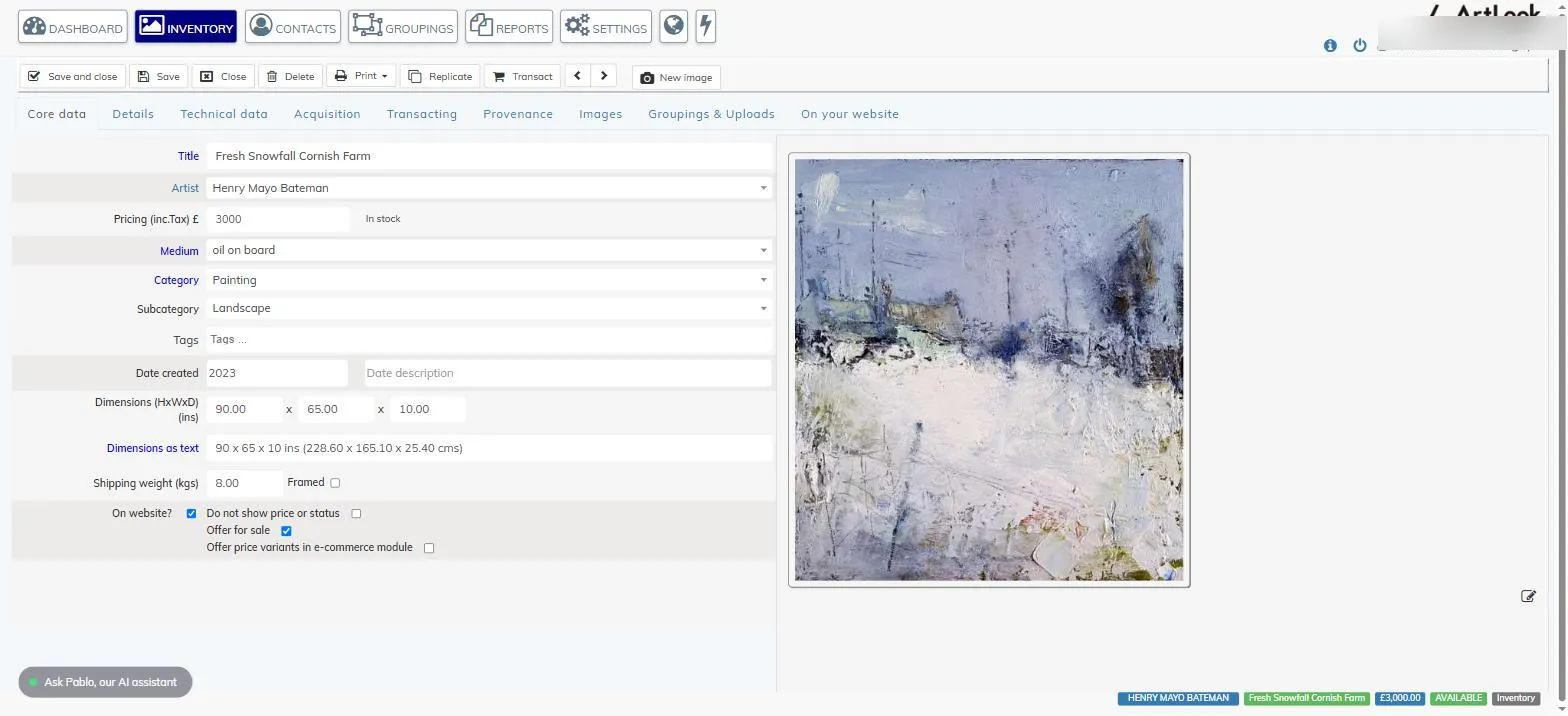
Toolbar actions
- Save and close — save your changes and return to the index.
- Save — save your changes and stay on the record.
- Close — leave the record without saving.
- Delete — delete this record, after a confirmation prompt.
- Print — a menu of reports for this record: Quick summary, Full details, Income, Transaction document, and Data report.
- Replicate — create a duplicate of this record, so you can use it as a starting point for a similar piece.
- Transact — record a sale (or other transaction) against this item directly, without needing to open the Transacting tab.
- The left/right arrows step to the previous or next record in your current list, without returning to the index.
- New image — add a new image to this record directly from the toolbar.
Core data
The main details for the piece: title, artist, pricing (inclusive of tax — with a note of when it went into stock), medium, category and subcategory, tags, date created, dimensions, shipping weight, and whether it’s framed. Fill in date created if you can — it now also displays as the piece’s year on its individual website page. The website checkboxes here control whether the piece appears on your website at all, whether its price or status is hidden, and whether it is to be offered for sale on your website (with price variants, if you use the e-commerce module) — see how Ecommerce works.
Details
A longer description (with basic rich-text formatting), short/long/secondary reference fields, country, and free-text notes.
If you are typing directly in to one of these fields you can use the available formatting buttons for styles and you can also use the Link (chain-link button) to add a link to another page on your website or even an external site.
You can also paste text in to these fields but use caution! If you are pasting from (for example) Word although it looks as if you are copying and pasting just your text you are also importing hidden formatting as well. This will often make your text look strange and different from other text on your website.
If possible, always copy text from programs like Word into a simple text editor (like Notepad on a PC or TextEdit on a Mac) then copy from there into Artlook.
If pasting text still shows strange styles and inconsistencies you will need to clear out the text in the Artlook field as well as any stray formatting. Do this by selecting all of the text in the field and then hit the Backspace/Backdelete key TWICE. The field will now be completely empty. From here you can paste in your ‘raw’, unformatted text.
TIP: completely avoid this problem in future by always pasting in text using Ctrl-Shift-V (Option-Shift-V on Macs). This ensures that formatting is removed from the text you are pasting.
Technical data
Physical and, where relevant, photographic metadata — height and width, whether the image is colour, and camera details such as aperture, camera make/model, shoot date, shutter speed, ISO, focal length and location. Most galleries won’t need to fill most of this in.
Acquisition
How and from whom the piece was acquired: supplier, acquisition organiser, acquisition type and date, and tax treatment. Enter either a fixed acquisition price or a commission percentage — not both — and the Metrics panel below works out how the sale price splits between what’s retained, tax, and what’s due to the supplier.
Transacting
A history of transactions against this item (date, price, status, buyer), plus current location and condition. Use New offer to record an offer, and Convert item to edition if the piece needs to become an edition after the fact.
Provenance
A general provenance description, plus a table of provenance events you can add to individually (type, dates, description, price).
Images
Add further images and view them as a slideshow. The first image added becomes the main image shown throughout the record.
If a photo displays sideways or upside down, hover over the bottom right corner of the image to reveal a small edit icon, which opens rotation buttons: flip vertically, flip horizontally, and rotate 90° left or right. Remember to click the orange save button afterwards, or the rotation won’t stick.
Groupings & Uploads
Add the item to one or more groupings, set its price and sequence within each, and choose whether it should only appear on your website within groupings rather than as a standalone piece. You can also upload a PDF document or a video (or link to one on YouTube) here.
On your website
A read-only summary of where this item currently appears on your public website — for example under the artist’s listing, or as an individual page within a grouping — with a link to each page and a note on whether the price is shown.
The screen footer
At the bottom right of the screen, a row of tags summarises the record at a glance — artist, title, price and status — alongside a label confirming you’re in the Inventory module.
Many of the individual fields above may be worth explaining in more detail; we’ll come back to those separately.