
Setting up an edition
First create a new inventory record in the usual way, filling in the details that apply to every item in the edition — category, medium, image and so on. Set the price on the Core data tab to the price of one edition item.
Converting the record to an edition
Open the record’s Transacting tab and click Convert item to edition.
Managing the items
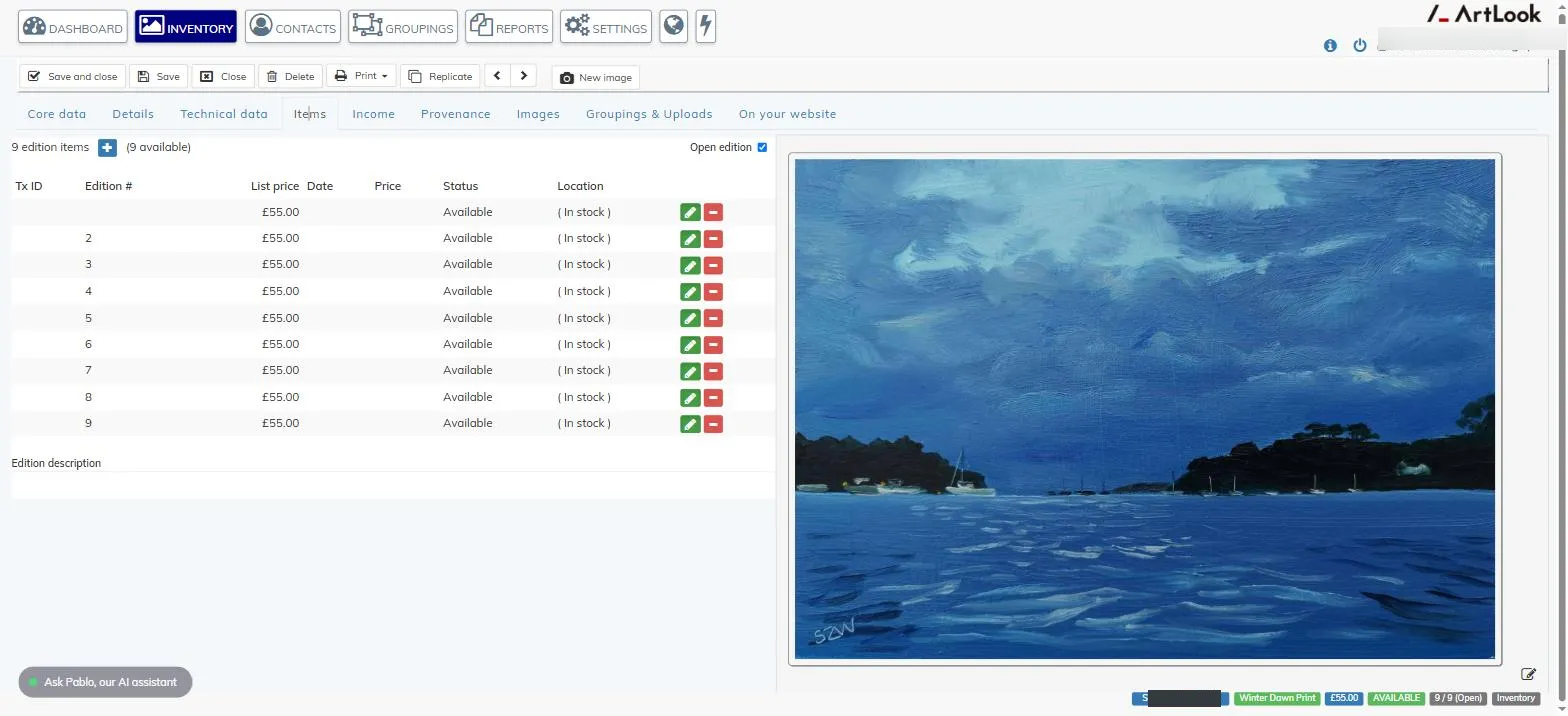
Converting a record adds an Items tab, starting with two item rows. Click the blue + button to add more, one click per row, until you have the number you need. Click Save to continue editing the items you’ve added, or Save and close and reopen the record.
Artlook assumes items are numbered sequentially, but you can include unnumbered items too — for an edition of 10 with 3 artist’s proofs, create 13 rows in total.
Click the green edit button on a row to open it, where you can:
- change its edition number
- set its own list price
- record notes specific to that item
- set the item’s location and status — Available, Sold, Reserved or Consigned — which triggers the same transaction handling as selling a single-item record
Click Save and close on the item when you’re done. Hover over a row in the items list to see its notes without opening it.
Use the Edition description field at the bottom of the Items tab for a description of the whole edition — for example, “Edition of 10 with 3 Artist’s Proofs; each signed and numbered by the artist”.
Real and open edition sizes
By default, Artlook shows an edition’s size as the number of items you’ve created for it — “Edition of 5” for 5 item rows. Two options on the Transacting tab let you override this, for when the record doesn’t hold every item in the edition:
- Real edition size — set this when the items in this record are only part of the true edition (for example, you’re only handling 5 of an edition of 20). Artlook then displays “Edition of 20” — the real size — rather than the number of items actually in the record.
- Open — mark the edition as Open when there’s effectively no fixed limit, and more items can be added as needed. This replaces the edition size shown in the backend and on your website.
Both settings display wherever the edition size normally would, in the backend and on your website.